
With an ingenious tool, detaching the audio from MXF video turns a simple task: only in a click of mouse. Then, you can delete it directly or save it for future use. The following article will provide more information as well as a step by step guide on how to remove audio from MXF video files.
While editing an MXF clip, we may want to remove audio from MXF file completely instead of mute the audio and get only video stream as an output. Sometimes we may want to remove audio from the original file and add a new sound tracker. To help finish this task, Brorsoft MXF Converter for Mac (or Windows) software will extract audio from MXF easily, you can also replace the original audio with your desired audio with the software’s powerful edit feature.
This is not only the ideal audio remover, but also a good MXF video and audio converter. Meanwhile, it can be used as an MXF video editor. It provides common HD video editing functions like crop, cut, merge and more.

Follow the guide to Remove Audio Track from MXF Movies step-by-step.
Step 1. Import MXF recordings
Download Brorsoft MXF Converter for Mac (or Windows) from the website, install and run this software.
 (Note: Click here for OS X 10.5)
After installing the MXF Converter for Mac, you can click the “Add File” button to import the source MXF videos to this program.
Tip: If you need to convert MXF with wanted subtitles and audio track, you can click the drop down menu after “Subtitles” and “Audio” to select your desired tracks. What’s more, it also offers an option called Forced subtitles, which enables you to see subtitles only when actors are speaking a different language.

Step 2. Choose output format
Select an compatible format, e.g. H.264 .mp4, since it is compatible with almost any devices and media players.
Basically the “Common Video -> H.264 Video (*.mp4)” is just all right.
Or depends on your device, you can choose a suitable video format from catalogues.
Tip: If you think the video size this not suitable for your devices, you can first choose any one of the provided type, then change the settings. Please remember the file size is based more on bitrate than resolution which means bitrate higher results in bigger file size, and lower visible quality loss.
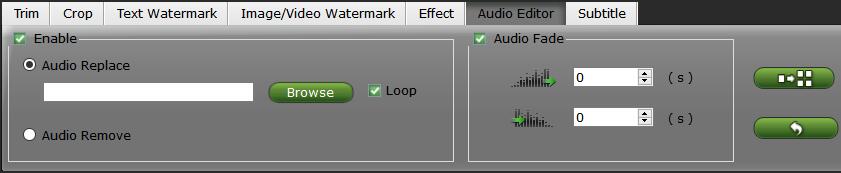
Step 3. Remove or replace audio.
By clicking the ![]() (edit icon) on the top main interface, then select Audio Editor, you can either replace/remove original audio, or set audio fade in/out effects.
(edit icon) on the top main interface, then select Audio Editor, you can either replace/remove original audio, or set audio fade in/out effects.
Step 4. Start to remove audio conversion
When all the settings are OK, click “Convert” button to remove MXF audio track conversion.
You can view the conversion progress and are able to cancel the converting process at anytime..
When the conversion is over, click “open” to locate the converted video files without unwanted audio track.
Additional Tips:
If you have problems when importing or editing your Canon, Sony, Panasonic etc, camera video files, you can check out “Brorsoft Camcorder/Camera Importing Tips” or “FCE, FCP, iMovie Column“to get your solutions.
Of course, if you need to get more import or output options, you also can choose Brorsoft iMedia Converter for Mac or Brorsoft Video Converter Ultimate for Windows, it can support nearly all popular video and audio formats and also has the advantages like MTS Converter for Mac and Wins.
More Guides:
Open and Play M2TS files via VLC Player
How to Import/Edit M2TS files in FCP 7/X
Show up MXF files in iTunes to iPad/iPhone
Import Sony PXW-FS7 MXF files to Davinci Resolve 11
Solve iMovie/FCE Won’t import MTS, M2TS files on Mac
Get the Best MXF Converter for macOS Sierra/Windows 10
Fixing MXF files importing issues with Corel VideoStudio X8
Convert MXF files with best Alternative tool for Panvideo Converter
Transcode/Convert MXF files to After Effects MPEG-2 format Editing