
In this article, you will learn the best way to import and edit .M2TS files in Adobe Premiere without rendering. Just Read On.
You may collect a number of MTS/M2TS videos from camcorders, like Panasonic, Canon, Sony full HD AVCHD camcorder. Ever met troubles while importing the M2TS files to Adobe Premiere Pro like below users? In this article, we will teach you how to edit M2TS videos in Premiere Pro freely.
No Audio displayed in Premiere timeline
“Hey, having an issue importing m2ts files into Premiere Pro. They import with no audio. I’ve tried a number of fixes including re-installing the Premiere, updating Premiere, changing the file locations and file extension .etc that I have found on Google with no success.”
File format not supported
“I am trying to import my Sony M2TS videos into Premiere CC. However, Premiere gives me an error saying “File Format Not Supported”. Does Premeire CC still not support MTS/M2TS videos?”
According to Premiere user guide, we can easily find that MTS/M2TS files from AVCHD camcorders can be supported by it. While the M2TS file type is a kind of compressed output format which is not an ideal format for editing in NLE system. That’s the reason why users meet so many issues while importing AVCHD (.m2ts) files to Premiere Pro timeline. To solve those problems, the quick workaround is to transcode M2TS files to Premiere native formats (MPG/MOV are highly recommended). Along with some help from third-party software, it can be done effortlessly. Here I share a simple guide on how to convert M2TS files for Premiere editing smoothly. If you’re facing the issues, read on to find the answer.
First download the App-Brorsoft MTS Converter for Mac.
Overall, the program is the best M2TS converter. With it, you can effortlessly transcode AVCHD MTS/M2TS to MPEG-2 or MOV, which will be compatible with Adobe Premiere. Besides Premiere, this software can also export DNxHD for Avid, MPEG-2 Premiere Element, Apple ProRes for Final Cut Pro, Apple InterMediate Codec for iMovie and more NLE systems for native editing. For Windows users, MTS/M2TS Converter windows version is the first choice. Just download it and follow the tutorial below to get the work done.
How to Encode AVCHD (.m2ts) files to MPEG-2 for Premiere Pro
1. Connect your camcorder to computer by USB, and then Click “Add” button to import your source AVCHD/M2TS files. If your videos are available on the desk, simply drag them directly into the program window.
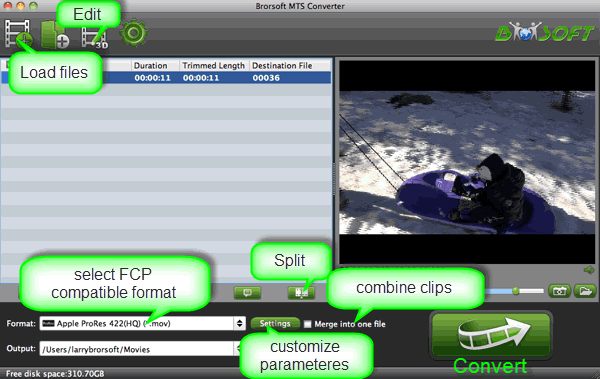
2. Click “Format” pull down list to select Adobe Premiere/Sony Vegas> MPEG-2(*.mpg) as the best video format for Premiere Pro. WMV, MOV formats are the good choice as well.

Tip – Profile Settings: In case the default settings do not fit your requirement, you can go to “Settings” page to adjust video size, bit rate, frame rate, sample rate and audio channels.
3. Tap “Convert” button to start transcoding M2TS video to MPG/MOV/WMV for importing to Premiere Pro CS4/CS5/CS6/CC. When the conversion task is finished, you can find the transcoded files under “Open” panel. Now, it is easy for you to import the converted M2TS files into Adobe Premiere Pro for further editing. Enjoy!
I looked for the solution in Premiere forum. But nothing got until I read this article. Much helpful!
Thank you for the tips you mentioned in this article. I have bought the program.
How can I work individual .mts clips in Premiere Pro?
Hi, I found this article on Google. Pla have a check:
http://www.avchdconverter.xyz/correct-method-to-edit-mts-files-in-premiere-cc/
Thank you for sharing!